
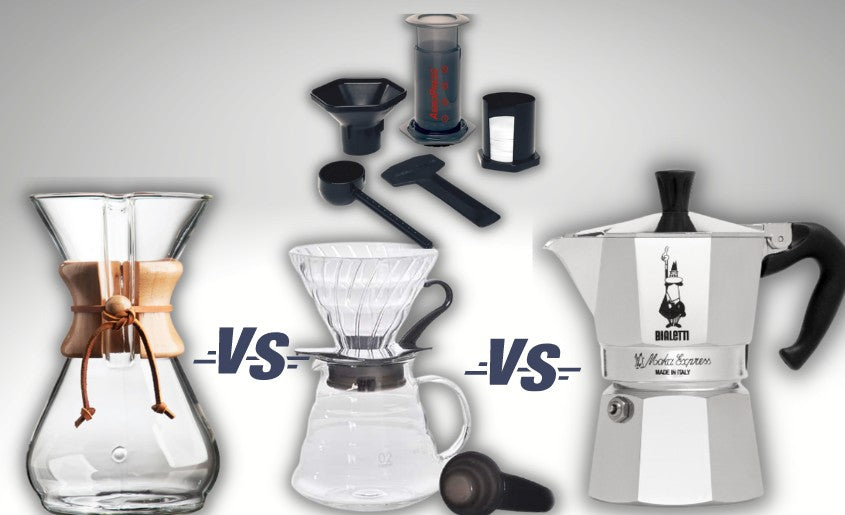
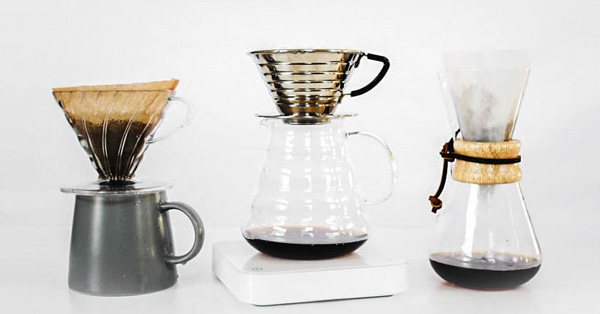
Pour Over Showdown: The Contenders
Brewing coffee by hand is about more than just caffeine. It's a way to control exactly how your cup tastes. The Chemex, V60, and AeroPress are the three most common tools for this, but they produce very different results. I've spent years using all three, and the choice usually comes down to how much effort you want to put in on a Tuesday morning.
The Chemex, with its elegant hourglass shape, feels like something out of a science lab – or a very stylish kitchen. It’s been around since 1941, and its design hasn’t changed much because, frankly, it doesn’t need to. The V60, a Japanese invention, offers a more direct, hands-on approach. Its simplicity is deceptive; mastering it requires practice and attention to detail. The AeroPress, the youngest of the bunch, is a bit of a rebel. It’s compact, versatile, and known for its ability to produce a surprisingly complex cup quickly.
These aren't just coffee makers; they represent different philosophies. The Chemex prioritizes clarity and a clean cup, stripping away oils and sediment. The V60 is all about control – letting the brewer dictate the extraction. The AeroPress focuses on immersion, creating a full-bodied, concentrated brew. Which one is right for you depends on your preferences, your patience, and your coffee beans.
Think about what you value in a cup of coffee. Do you want something delicate and nuanced, highlighting the subtle flavors of a light roast? Or do you prefer a bold, robust brew that can stand up to milk and sugar? Are you willing to spend time perfecting your technique, or do you need something quick and convenient? These are the questions we’ll answer as we break down each method.
chemex: clean and slow
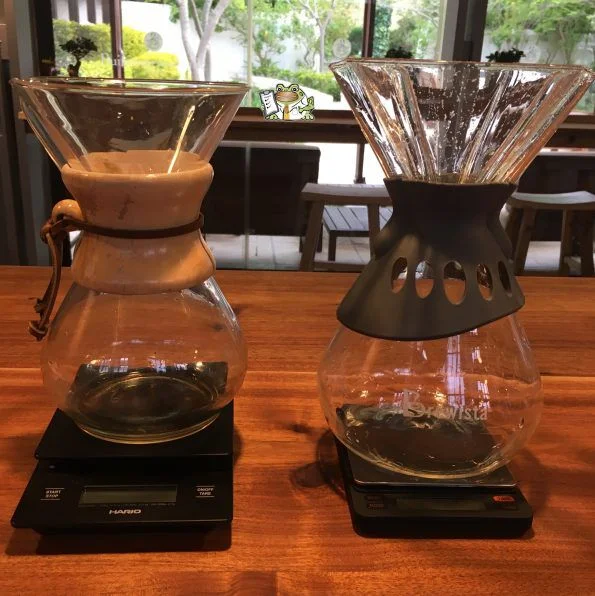
The Chemex is more than just a coffee maker; it’s a statement piece. Designed by Peter Schlumbohm in 1941, its sleek, one-piece construction of borosilicate glass is instantly recognizable. The original intent was to create a coffee maker that was both functional and beautiful, and I think Schlumbohm succeeded brilliantly. You can find Chemex brewers in museums, and for good reason – they’re a design classic.
The key to the Chemex’s unique flavor profile lies in its custom-designed filter papers. These are significantly thicker than standard paper filters, and they’re bonded, not glued. This means they don’t impart any papery taste to the coffee, but more importantly, they remove a substantial amount of oils and sediment. This results in a remarkably clean, bright cup of coffee. Downshiftology’s 2017 guide to Chemex brewing really highlights this clarity.
Brewing with a Chemex requires a bit of practice. You’ll need a gooseneck kettle for precise pouring, and a medium-coarse grind. I recommend starting with a coffee-to-water ratio of 1:15 – that's about 30 grams of coffee to 450 grams of water. Pre-wet the filter with hot water to rinse away any paper taste and warm the brewer. Then, slowly pour the water over the grounds in a circular motion, allowing them to bloom before continuing the pour.
Don't skip the bloom. Wetting the grounds and waiting 30 seconds lets the gas escape so the water can actually get inside the coffee particles. If you're using light roasts, the thick paper filters make the floral notes much easier to taste because they trap the heavy oils that usually mask those flavors.
Cleaning a Chemex is fairly straightforward. Simply remove the filter (which contains the spent grounds) and discard it. The glass carafe can be washed with warm, soapy water. Be careful, as the glass is relatively fragile. A Beautiful Mess offers a great overview of the process, emphasizing gentle handling.
I’ve always appreciated the ritual of Chemex brewing. It’s a slower, more deliberate process than other methods, and it forces you to slow down and appreciate the coffee. It's a great choice if you enjoy a clean, elegant cup and don't mind investing a little time and effort.
- Weigh 30g of coffee and 450g of water for a standard 1:15 ratio.
- Place the Chemex filter in the brewer.
- Rinse the filter with hot water.
- Add the coffee grounds.
- Bloom the coffee.
- Pour the remaining water slowly and evenly.
- Enjoy!
v60: the enthusiast's choice
The Hario V60 is arguably the most popular pour-over device among coffee enthusiasts. Its simple, conical shape and ribbed sides are instantly recognizable. The V60’s design encourages a fast, even flow rate, allowing for precise control over extraction. It’s a minimalist tool that rewards skill and attention to detail.
The V60 comes in a variety of materials: plastic, ceramic, and glass. Plastic V60s are the most affordable and durable, but some people find they retain heat too much. Ceramic V60s offer excellent heat retention and a more refined aesthetic. Glass V60s are visually appealing but are more fragile. The choice ultimately comes down to personal preference and budget.
The ribbed sides of the V60 are key to its functionality. They create space between the filter and the brewer, allowing for airflow and preventing the filter from collapsing. This ensures a consistent flow rate, which is essential for even extraction. The conical shape also concentrates the coffee grounds, maximizing contact with the water.
Filter choice is crucial when brewing with a V60. Hario offers both paper and metal filters. Paper filters produce a cleaner cup of coffee, similar to the Chemex, by removing oils and sediment. Metal filters allow more oils to pass through, resulting in a fuller-bodied brew. I personally prefer paper filters for most coffees, as they highlight the nuanced flavors.
Pour-over technique is paramount with the V60. Unlike the Chemex, which is more forgiving, the V60 requires a steady hand and a consistent pouring motion. Start with a bloom, then continue pouring in a slow, circular motion, maintaining a consistent water level. Experiment with different pouring patterns and flow rates to find what works best for your coffee and your taste. A 1:16 coffee-to-water ratio is a good starting point.
The V60 is a versatile brewer that can handle a wide range of coffee beans and roast levels. It’s a great choice for coffee lovers who enjoy experimenting and want to have complete control over their brew. It demands more attention than the Chemex or AeroPress, but the rewards are well worth the effort.
Essential Gear for Your Pour Over Journey: V60, Chemex, and AeroPress Companions
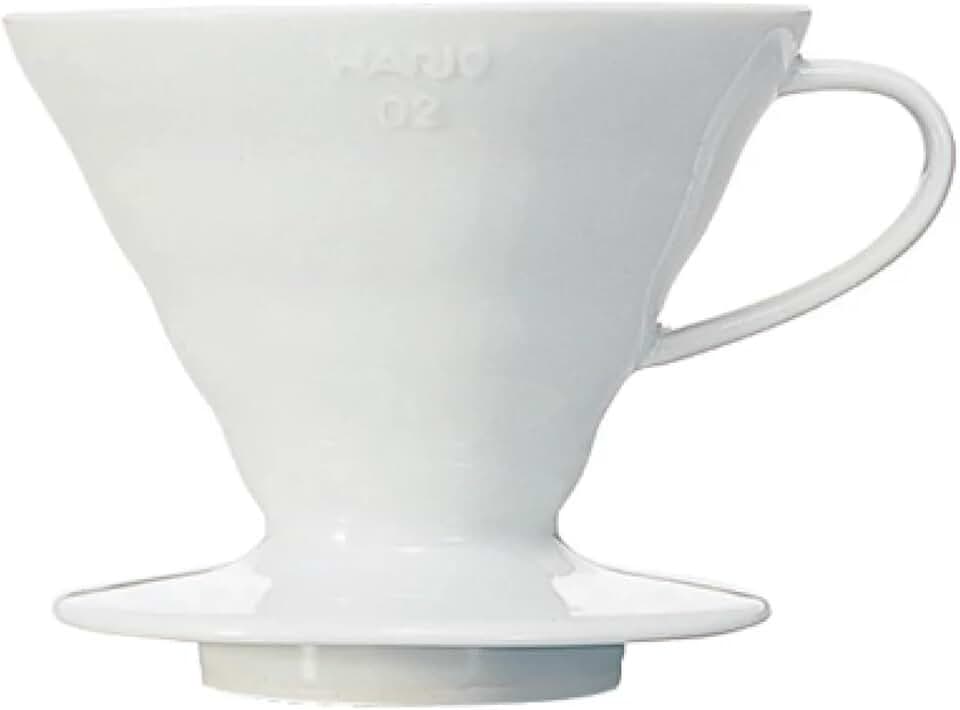
Ribbed interior for optimal water flow · Large single hole for varied pouring techniques · Ceramic construction retains heat
The Hario V60 is a staple for pour-over enthusiasts due to its design that allows for precise control over brewing variables.

Iconic hourglass-shaped glass carafe · Requires proprietary bonded paper filters · Produces a clean, bright cup of coffee
The Chemex is celebrated for its elegant design and its ability to brew an exceptionally pure and flavorful cup, free from sediment.

Versatile brewing methods (standard, inverted) · Fast brew times · Durable and portable construction
The AeroPress offers unparalleled versatility and speed, allowing for experimentation with different coffee styles and quick brewing on the go.
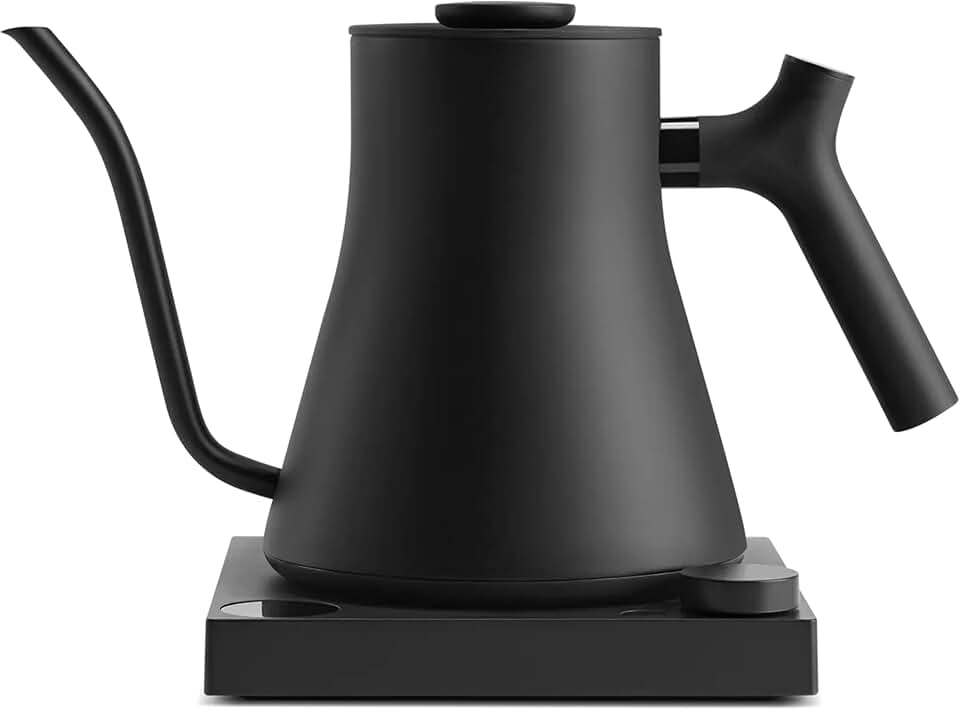
Precise temperature control with PID controller · Integrated brew stopwatch · Scheduling feature for pre-heating
This kettle provides meticulous temperature accuracy and convenient features like a built-in timer, essential for consistent and optimal pour-over brewing.

Flat bottom with three small drainage holes · Wave filter design for stable brewing · Durable glass construction
The Kalita Wave dripper is designed for ease of use and consistency, its unique design minimizing variables for a balanced brew.
As an Amazon Associate I earn from qualifying purchases. Prices may vary.
AeroPress: Speed and Versatility
The AeroPress is a bit of an outlier in the pour-over world. It doesn’t rely on gravity and a paper filter in the same way as the Chemex or V60. Instead, it uses air pressure to force water through the coffee grounds. This results in a fast, concentrated brew that’s incredibly versatile. It was invented by Alan Adler, the inventor of the Aerobie flying disc, in 2005.
The AeroPress utilizes an immersion brewing method, meaning the coffee grounds are fully submerged in water for a period of time before being pressed. This allows for maximum extraction and a full-bodied flavor. There are two main methods: the standard method and the inverted method. The standard method involves placing the AeroPress directly on top of your mug, while the inverted method involves flipping the AeroPress upside down before adding the coffee and water.
The inverted method is popular because it allows for a longer steep time without the risk of dripping. However, it requires a bit more caution, as you need to be careful when flipping the AeroPress over. Grind size for the AeroPress is typically medium-fine. A brew time of 1-2 minutes is a good starting point, but you can adjust this to your liking.
One of the biggest advantages of the AeroPress is its portability. It’s lightweight, durable, and doesn’t require any electricity. This makes it a perfect travel companion for coffee lovers. It’s also incredibly easy to clean – simply push the plunger to eject the spent grounds.
The AeroPress is known for producing a strong, concentrated brew that’s similar to espresso. However, you can also dilute it with hot water to create a more traditional cup of coffee. It’s a great option for those who want a quick, clean cup and don’t mind experimenting with different brewing parameters.
Taste Test: What Does Each Method Produce?
The flavor profiles produced by each method are distinctly different. Chemex consistently delivers a clean, bright cup with pronounced clarity. It’s excellent for highlighting the delicate floral and fruity notes of lighter-roast coffees. You won’t find much body or sediment in a Chemex brew.
V60, on the other hand, offers more control over flavor. By adjusting your pour technique and filter choice, you can tailor the brew to your preferences. It can produce a cup that’s similar to the Chemex in terms of clarity, or a more full-bodied brew with more texture. The V60 is a great all-rounder.
AeroPress consistently delivers a full-bodied, concentrated brew. It’s known for its rich, chocolatey flavors and smooth mouthfeel. It’s a great choice for darker-roast coffees, as it can tame their bitterness and bring out their sweetness. It's also surprisingly good with lighter roasts if you're looking for a strong, intense flavor.
Different coffee beans will react differently to each method. For example, a bright, acidic Ethiopian Yirgacheffe will really shine in a Chemex, while a bold, earthy Sumatran Mandheling will be better suited for the AeroPress. I tend to reach for the Chemex when I want to appreciate the nuances of a delicate coffee, the V60 when I want a balanced, customizable brew, and the AeroPress when I need a quick, strong cup.
Pour Over Coffee Comparison: Flavor Characteristics
| Brew Method | Clarity | Body | Acidity | Sweetness | Complexity |
|---|---|---|---|---|---|
| Chemex | Very High | Light to Medium | Medium | Clean, subtle | Medium to High – highlights nuanced flavors |
| V60 | High | Medium | Bright | Balanced | Medium – allows for a wide range of flavor expression based on technique |
| AeroPress | Moderate | Medium to Full | Moderate | Pronounced | Medium – capable of both clarity and richness depending on brew time and technique |
| Chemex (with metal filter) | Moderate | Medium | Medium | Fuller, more syrupy | Medium - retains more oils and sediment, increasing body and flavor |
| V60 (with paper filter) | High | Light-Medium | Bright | Clean | Medium - emphasizes origin characteristics |
| AeroPress (inverted method) | Moderate | Full | Lower | Rich, chocolatey | Medium to High – promotes fuller extraction and body |
| AeroPress (standard method) | Moderate to High | Medium | Bright | Balanced | Medium - versatile, can be adjusted for different flavor profiles |
Illustrative comparison based on the article research brief. Verify current pricing, limits, and product details in the official docs before relying on it.
Cleaning and Maintenance: The Long View
Cleaning each brewer is relatively straightforward, but there are some key differences. The Chemex requires careful filter disposal, as the spent grounds can be messy. The glass carafe can be washed with warm, soapy water, but be gentle to avoid breakage. Occasional deep cleaning with a specialized glass cleaner can help remove any stubborn stains.
The V60 is relatively simple to clean. Simply remove the filter and discard it. The brewer can be washed with warm, soapy water. Regular filter changes are essential to prevent buildup and maintain optimal flavor. The plastic V60s are dishwasher safe, but the ceramic and glass versions should be hand-washed.
The AeroPress is the easiest to clean by far. Simply push the plunger to eject the spent grounds, then rinse the chamber and plunger with water. It’s quick, easy, and mess-free. The AeroPress is also dishwasher safe. All three brewers are fairly durable, but the glass components of the Chemex and V60 are more susceptible to breakage than the plastic AeroPress.
Cost Breakdown: Initial Investment & Ongoing Expenses
The initial investment for each system varies. A Chemex brewer typically costs between $40 and $60, depending on the size and model. V60 brewers range from $20 for a plastic model to $80 or more for a ceramic or glass version. The AeroPress is the most affordable, typically costing around $30-$40.
Ongoing expenses include filters and, potentially, a gooseneck kettle. Chemex filters are relatively expensive, costing around $15-$20 for a pack of 100. V60 filters are more affordable, costing around $10-$15 for a pack of 100. AeroPress filters are reusable, so there’s no ongoing cost. A good quality gooseneck kettle, while not essential, is highly recommended for precise pouring and will set you back $30-$100.
Over the long term, the AeroPress is the most cost-effective option, followed by the V60, and then the Chemex. However, the initial investment is relatively small for all three systems, so the long-term cost difference isn’t significant.
Which brewing method do you use most frequently for your daily coffee?
Based on our 2026 comparison guide, we want to know which manual brewer currently leads in your kitchen. Cast your vote below to see how your preference aligns with the Real Coffee Club community.
No comments yet. Be the first to share your thoughts!