
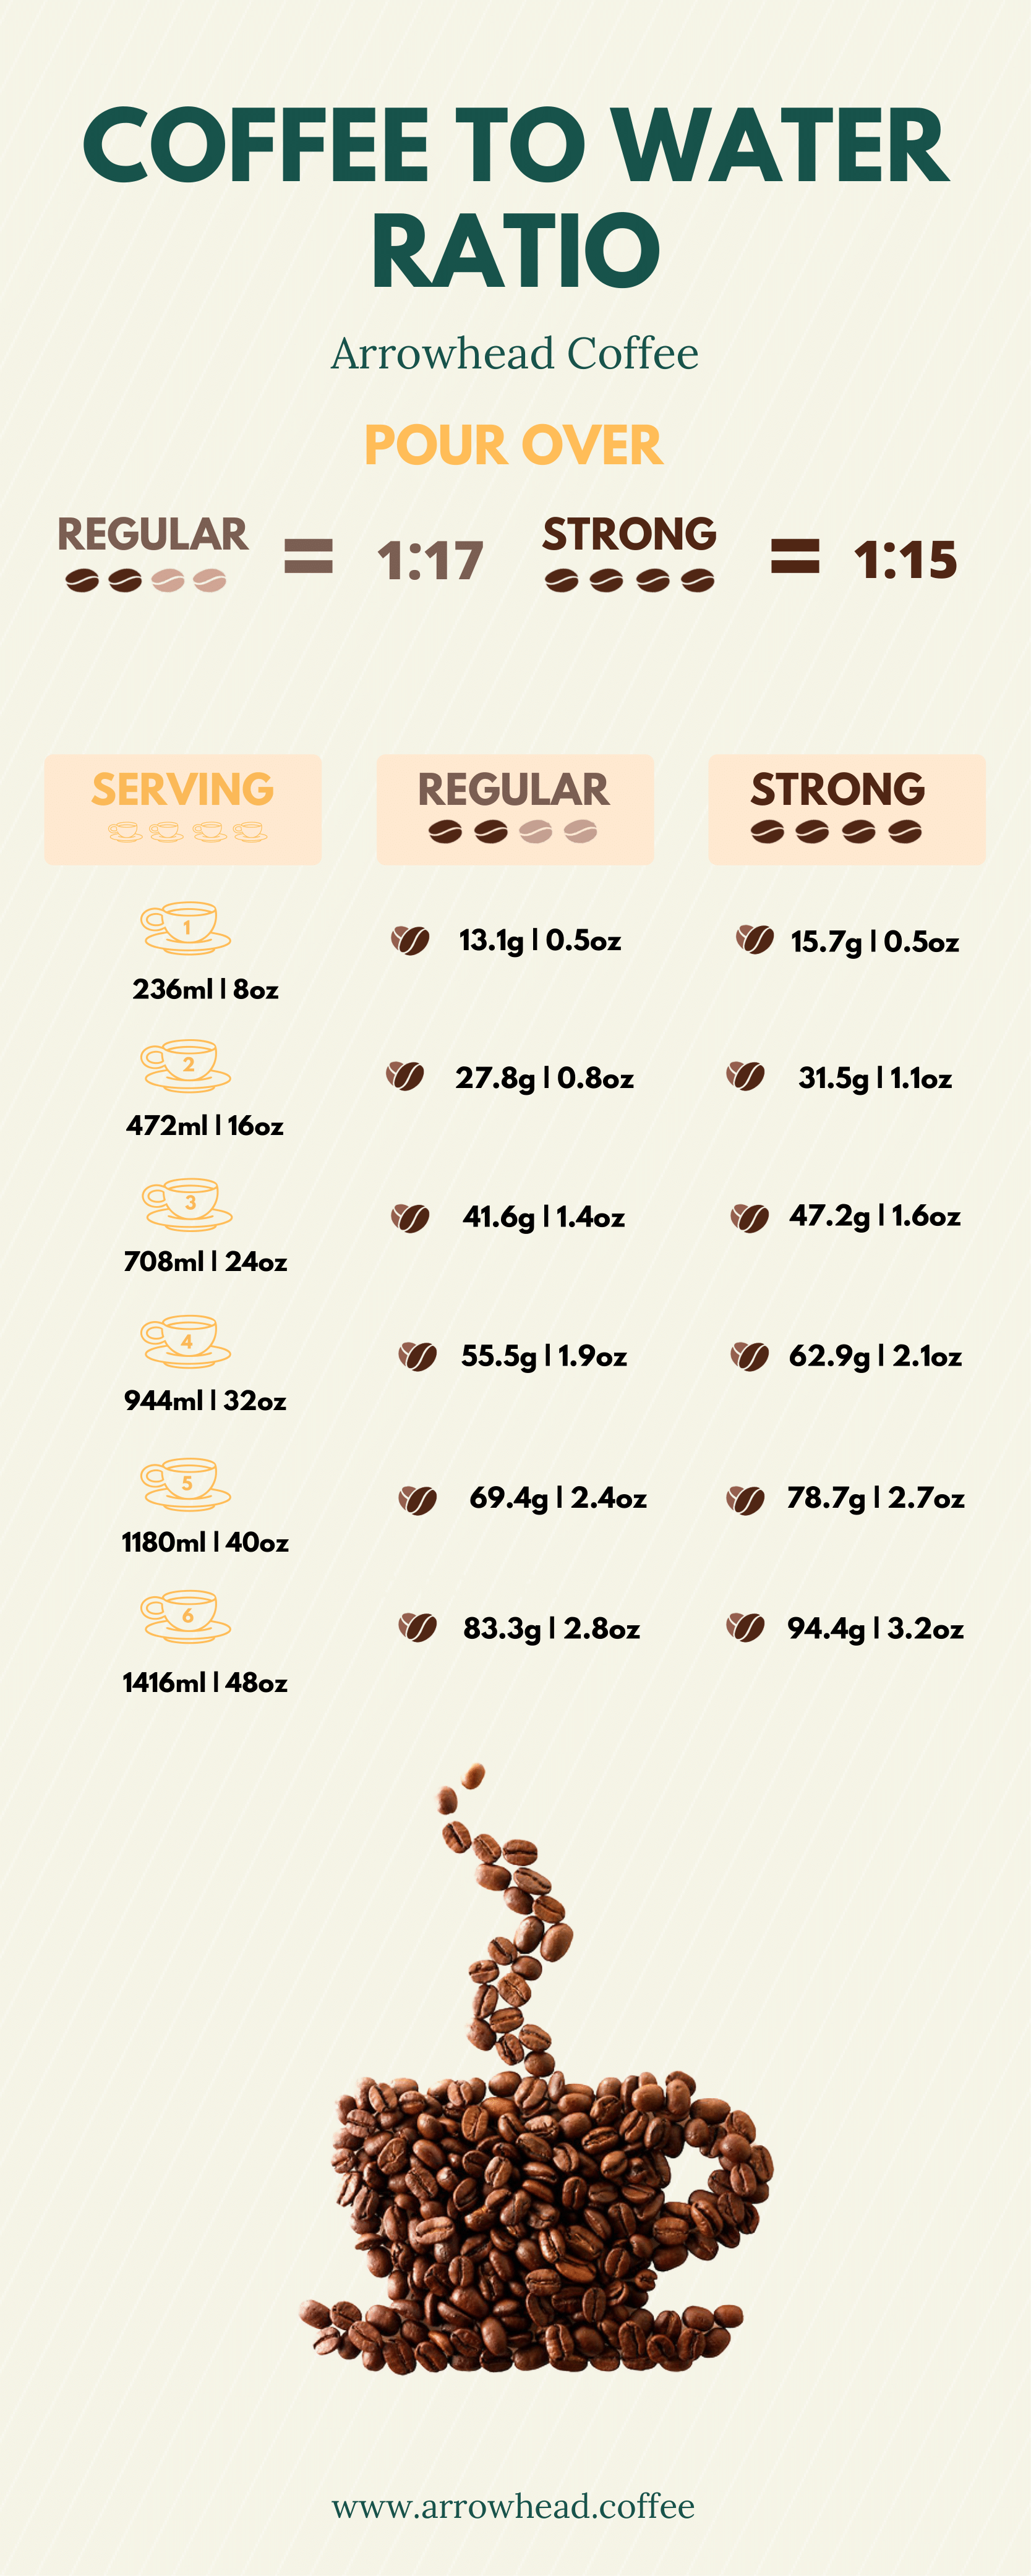
The golden ratio of pour over
The foundation of a great pour over is, unsurprisingly, the ratio of coffee to water. You’ll often hear about the “golden ratio,” and for good reason. Most coffee professionals land somewhere between 1:15 and 1:17 – that’s one part coffee to fifteen or seventeen parts water, by weight. This isn’t an arbitrary number; it’s rooted in the solubility of coffee. Those ratios generally yield around 18-22% extraction, which is where we start to get the most desirable flavors from the bean.
But here’s where things get interesting. This ratio isn’t set in stone. It’s a starting point, a guide. I’ve spent years experimenting, and what works beautifully for a bright, floral Ethiopian Yirgacheffe will be different than what’s best for a bold, earthy Sumatran Mandheling. It's about finding that sweet spot where the coffee sings. Don’t be afraid to adjust! A good place to start when experimenting is to adjust the ratio in 0.2 increments.
I aim for a balance between sour under-extraction and bitter over-extraction. While the math matters, your tongue is the better judge. I usually start at 1:16. If the cup tastes thin, I tighten the ratio next time. If it's harsh, I add more water.
Adjusting for bean density
Not all coffee beans are created equal. Density plays a significant role in how water interacts with the coffee grounds. Lighter, less dense beans – often found in Ethiopian or Kenyan coffees – have more surface area for extraction. This means they can extract quickly, and you might need to use a slightly higher ratio of water to coffee to avoid over-extraction. Think 1:16.5 or even 1:17.
Conversely, denser beans, like those from Sumatra or Sulawesi, require a bit more effort to extract. A lower ratio, like 1:15 or even 1:14.5, will help ensure you get a full and balanced extraction. Visually, you can often tell the difference in density by simply looking at the beans. Less dense beans will appear more airy and take up more volume, while denser beans are smaller and more compact.
Roast level also impacts this. Darker roasts generally become less dense as the roasting process creates more internal structure. So, a dark roasted Sumatran might behave more like a medium-roasted Kenyan in terms of ratio. Paying attention to these nuances can dramatically improve your results.
How water temperature changes flavor
Temperature is a critical, often underestimated, factor. It's not just about getting the water hot enough; it's about controlling the speed of extraction. Too hot (above 205°F / 96°C), and you’ll accelerate extraction, leading to bitterness and potentially scorching the delicate flavors. Too cold (below 195°F / 90°C), and you’ll under-extract, resulting in a sour, weak cup.
The sweet spot generally falls between 195-205°F (90-96°C). I find 200°F (93°C) to be a great all-around temperature, but I adjust based on the bean. Lighter roasts often benefit from slightly higher temperatures, while darker roasts do well with slightly cooler water. An electric gooseneck kettle with precise temperature control is a worthwhile investment.
I’ve experimented with different thermometers, and I strongly recommend a digital thermometer with a fast response time. Consistency is key. Even a few degrees can make a noticeable difference. I've found that using a temperature-controlled kettle really opens up the possibilities to fine-tune extraction.
Grind size is more than a label
“Medium” grind is the enemy of precision. It’s far too vague. We need to think about grind size in quantifiable terms. A good starting point is around 200-300 microns for most pour over methods. However, the ideal grind size depends heavily on your pour over device. A Hario V60, with its conical shape and faster flow rate, typically requires a finer grind than a Chemex, which has a thicker filter and slower flow.
What does a 200-micron grind look like? It should feel like fine sand – slightly coarser than table salt. If the water flows through too quickly, the grind is likely too coarse. If it drips very slowly or stalls, it’s too fine. The key is to observe the flow rate and adjust accordingly. A good flow rate for a V60 is around 2-3 minutes for a typical serving size.
I've found that a burr grinder is essential for achieving consistent grind size. Blade grinders produce an uneven grind, leading to inconsistent extraction. Experiment with small adjustments to your grinder setting – even a single “click” can make a difference. Don’t be afraid to dial it in until you achieve the desired flow rate and extraction.
Flow Rate & Pouring Technique
Consistent flow rate is paramount. A shaky hand or inconsistent pouring will lead to uneven extraction. A gooseneck kettle is your best friend here – the narrow spout provides precise control over the water flow. The goal is a steady, even stream of water saturating all the coffee grounds.
There are different pouring patterns, each with its own effect. The spiral pattern involves slowly pouring in a circular motion, starting from the center and working your way outwards. Concentric circles involve pouring in progressively larger circles. I personally prefer the spiral pattern as it seems to provide more even saturation. The 'bloom' is key, too – a small initial pour to wet the grounds, allowing them to degas for around 30-45 seconds.
Bloom time is important because it allows carbon dioxide to escape from the coffee grounds. This creates space for the water to penetrate the grounds more effectively. After the bloom, continue pouring slowly and steadily, maintaining a consistent water level. Practice makes perfect; don’t be discouraged if your first few attempts aren’t flawless.
TDS & Extraction Yield: Measuring Success
This is where we move beyond subjective taste and into the realm of objective measurement. Total Dissolved Solids (TDS) is a measure of the amount of coffee solubles in your brew. It’s expressed as a percentage. Extraction yield, on the other hand, tells you what percentage of the coffee grounds have been dissolved into the water. These two metrics are closely related and provide valuable insights into your brewing process.
A refractometer is the tool you need to measure TDS. It’s a relatively inexpensive device that provides a quick and accurate reading. The ideal TDS range for pour over coffee is generally between 1.2% and 1.5%. This corresponds to an extraction yield of around 18-22%. If your TDS is too low, you’re likely under-extracting. If it’s too high, you’re over-extracting.
If your numbers are off, you change the grind size or water temperature. A TDS meter is a luxury, but it removes the guesswork when you're trying to replicate a specific cup. It turns a lucky brew into a repeatable recipe.
Pour Over Coffee: TDS Ranges, Flavor Profiles & Adjustments
| Total Dissolved Solids (TDS %) | Flavor Profile | Possible Cause | Recommended Adjustment |
|---|---|---|---|
| Less than 1.0% | Sour, Salty, Weak | Underextraction | Finer Grind, Higher Water Temperature, Longer Brew Time |
| 1.0% - 1.3% | Underdeveloped, Acidic | Underextraction | Finer Grind, Slightly Higher Water Temperature |
| 1.3% - 1.5% | Balanced, Sweet, Clean | Optimal Extraction | Maintain Current Settings |
| 1.5% - 1.8% | Balanced, Full-Bodied | Approaching Overextraction | Coarser Grind, Slightly Lower Water Temperature |
| 1.8% - 2.0% | Bitter, Astringent | Overextraction | Coarser Grind, Lower Water Temperature, Shorter Brew Time |
| Greater than 2.0% | Harsh, Empty | Overextraction | Significantly Coarser Grind, Lower Water Temperature |
Illustrative comparison based on the article research brief. Verify current pricing, limits, and product details in the official docs before relying on it.

No comments yet. Be the first to share your thoughts!